How to Replace a Kitchen Faucet
To replace a kitchen faucet, shut off the water, disconnect and remove the old faucet, secure the new faucet, and reconnect its supply lines. Match the sink holes and connections first, then flush the faucet and check for leaks.
On this page (9 sections)
- What should you check before replacing a kitchen faucet?
- What tools and replacement parts should you buy?
- How do you remove the old kitchen faucet?
- How should you clean and seal the mounting surface?
- How do you install and secure the new faucet?
- How do you connect the hot and cold supply lines?
- How do you flush the faucet and check for leaks?
- What mistakes cause problems after replacement?
- Which parts should you choose for your faucet replacement?
To learn how to replace a kitchen faucet, start by matching the new faucet to your sink, then shut off the water before disconnecting anything. Remove the old fixture, clean the mounting surface, secure the replacement, and reconnect the water lines.
The hardest part is often reaching old mounting nuts. Check the space below the sink before buying tools, and make sure both shutoff valves stop the water before taking the faucet apart.
What should you check before replacing a kitchen faucet?
Check sink holes, mounting thickness, spout reach, and water connections before choosing a replacement. A faucet can cover the right holes yet still crowd the backsplash or fail to reach far enough into the basin.
Count the openings from below because a deck plate may hide unused holes. Measure their spacing and check the new plate’s coverage; our guide to 1-hole vs 3-hole kitchen faucets explains the common layouts.
Measure the sink or countertop thickness, including any support beneath it. The mounting shank and hardware must accommodate that depth.
Check overhead clearance and the space behind the handle through its full movement. Choose a spout that directs water into a useful part of the bowl, rather than close to its back edge.
Below the sink, identify both shutoff valves and measure the route to the faucet connections. For a pull-down model, leave room for the hose and weight to move past the drain, stored items, and disposal.
Use how to choose a kitchen faucet to compare fit details, or browse our kitchen faucet guide if you’re still deciding on a style.
What tools and replacement parts should you buy?
Buy only the parts your faucet and sink need. Have an adjustable wrench, bucket, towels, flashlight, and eye protection ready, then decide whether the mounting nuts require a dedicated faucet wrench.
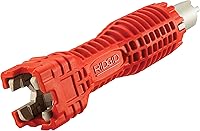
Tools for replacing a kitchen faucet in tight spaces
The RIDGID EZ Change suits jobs where the basin blocks access to common faucet nuts. Its slotted handle clears supply lines, while interchangeable inserts fit several nut shapes and sizes.
Choose it if its inserts match your hardware and there’s room to turn the handle. Skip it if your faucet includes a suitable mounting tool or uses hardware outside its supported shapes.
Seat the tool fully before turning. Extra leverage on a corroded connection can twist a valve or damage the sink, so stop if surrounding parts move.
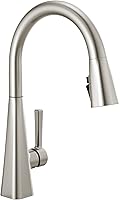
A replacement faucet for everyday dishwashing
The Moen Adler suits buyers who want a manual, single-handle pull-down faucet. It supports 1- or 3-hole installation and includes a deck plate, mounting hardware, and attached supply lines.
Its aerated stream and rinse modes cover everyday filling and cleanup, and the Reflex system supports hose movement and docking. Moen’s Spot Resist Stainless finish is designed to resist fingerprints and water spots.
At 14.56 in tall, it needs clearance beneath shelves or cabinets. Skip it if you want touchless control, lack space for a pull-down hose, or cannot accommodate its right-side handle.
How do you remove the old kitchen faucet?
Remove the old faucet only after confirming both water supplies are off. Empty the cabinet and place a bucket beneath the connections to catch water left in the hoses.
- Close both shutoff valves without forcing them.
- Open the faucet and check the hot and cold positions until flow stops.
- Close the handle, then disconnect the supply lines with towels ready.
- Disconnect any separate sprayer hose or other components as the old faucet requires.
- Have someone hold the faucet while you loosen its mounting hardware below.
- Lift the fixture out, guiding hoses through the opening without snagging them.
Use a second wrench to steady a fitting where needed, rather than letting the attached pipe take the twisting force. Photograph connections before removal if their arrangement is hard to see.
If water continues flowing or a valve body moves, stop before disconnecting anything. Have a plumber address a valve that won’t isolate the supply.
For stuck mounting hardware, see how to remove a kitchen faucet before applying more force.
How should you clean and seal the mounting surface?
Remove old sealant and use the seal specified for the new faucet. A clean, dry surface lets its gasket or approved seal sit evenly beneath the base.
Lift residue with a scraper suitable for your sink material, avoiding scratches. Check for cracks, loose countertop material, or an uneven mounting area before continuing.
Oatey Plumbers Putty is useful when the faucet instructions allow putty on the mounting surface. Oatey’s oil-free, non-staining formula suits natural surfaces including granite, marble, and quartz, and stays flexible.
Choose it for an approved putty seal, especially where surface staining matters. Skip it when the faucet calls for a gasket alone or another sealant, and never pack it into supply-line fittings.
Don’t stack extra sealing materials “just in case.” They can prevent the base from seating as intended.
How do you install and secure the new faucet?
Secure the faucet with its base flat, handle clear, and hoses free of twists. Check alignment before the final tightening, while the fixture can still move.
- Arrange the gasket, deck plate, and faucet in the order shown in the instructions.
- Feed the shank and hoses through the correct opening without forcing connectors.
- Fit the washers, bracket, and mounting nut from below.
- Center the faucet and check handle and spout movement from above.
- Tighten the mounting hardware as directed, without overtightening.
A helper above the sink makes alignment easier. Don’t use the spout as a lever to straighten the faucet after securing it.
For a pull-down faucet, connect the spray hose and position its weight as instructed. Pull out and release the head several times, moving stored items or rerouting obstructions if the hose catches.
How do you connect the hot and cold supply lines?
Match both connector sizes and the required hose length before making water connections. Route hot and cold lines according to the faucet labels, avoiding sharp bends, tension, or rubbing against cabinet edges.
PROCURU’s 2-pack suits faucets that accept separate hoses with a 3/8 in compression valve connection and a 1/2 in FIP faucet connection. Each hose is 24 in long, with 316 stainless steel braiding and nickel-plated brass nuts.
Choose these when both ends match and the length allows a relaxed curve. Skip them for a different fitting size or a faucet whose attached hoses already reach the valves.
They are not automatic extensions for the Adler’s attached lines. Follow the faucet’s approved connection method if its hoses don’t reach.
Start nuts by hand to avoid cross-threading, then tighten as directed. Don’t automatically add thread tape: compression and washer-sealed connections generally seal at their mating surfaces, not the threads.
How do you flush the faucet and check for leaks?
Open the valves slowly, flush the faucet as instructed, and inspect connections with the water both running and off. Flushing helps clear debris disturbed during replacement.
- With the faucet handle off, slowly open each supply valve and inspect the fittings.
- Follow the flushing procedure, including removing the aerator or spray head if directed.
- Run hot and cold water, then restore any removed parts.
- Operate the sprayer and move its hose through its full travel.
- Turn the faucet off and inspect beneath the sink again.
Dry each fitting, then touch it with a clean paper towel to reveal small leaks. Recheck after a few minutes and later that day.
If a connection drips, shut off the supply and relieve pressure before adjusting it. Repeated tightening can damage seals; inspect alignment and washers instead.
Water around the base may need a different repair from a leaking hose. Use our guide to why a kitchen faucet leaks at the base to narrow down the source.
What mistakes cause problems after replacement?
The most common avoidable problems are mismatched parts, trapped hoses, and overtightened connections. Check fit before installation and hose movement before putting items back in the cabinet.
If flow is weak, check that both valves are open and no line is kinked. Follow the faucet’s cleaning instructions for debris in the aerator or head; our low kitchen faucet pressure guide covers further checks.
Keep the pull-down hose’s path clear during everyday use. Clean the finish with a soft cloth and products allowed by the faucet instructions, avoiding abrasive pads.
Don’t leave a damp cabinet to “see if it stops.” Isolate the water and find the source before using the sink again.
Which parts should you choose for your faucet replacement?
When deciding how to replace a kitchen faucet, choose the fixture first and buy supporting parts only after checking its instructions. The Adler suits a manual pull-down setup; the PROCURU hoses suit matching separate-line connections.
Choose the RIDGID tool when access and nut shape justify it. Choose Oatey putty only for an approved mounting seal, rather than treating all 4 products as a required kit.
Proceed yourself when the valves work, the mounting area is sound, and every connection matches. Bring in a plumber for failed shutoffs, damaged pipes, or connections that won’t seal.
Keep the cabinet clear until everything stays dry. If moisture returns around the fixture, follow the base leak guide to locate it.
Frequently asked questions
How long does it take to replace a kitchen faucet?
Allow a few hours for a straightforward replacement, including cleanup and leak checks. Easy access and matching connections shorten the job, while corroded nuts or faulty shutoff valves can delay it.
Gather the parts first and avoid starting when you cannot leave the water off if a problem appears.
Do I need to replace the supply lines with a kitchen faucet?
Replace damaged, corroded, leaking, or incompatible supply lines, but check whether the new faucet already has attached lines. Separate hoses must match both connection sizes and reach without stretching or kinking.
If a valve moves while you loosen a connector, stop before damaging the pipe behind it.
Can I install a one-hole faucet in a three-hole sink?
Yes, if the faucet supports that installation and a suitable deck plate covers the unused holes. Check hole spacing, plate coverage, and mounting surface thickness before buying.
A separate sprayer or soap dispenser may occupy another hole, so count all the openings rather than judging by the old faucet alone.
Should I use plumber's putty when installing a kitchen faucet?
Use plumber's putty only when the faucet instructions permit it and the formula suits the mounting surface. Many faucets use a supplied gasket instead, while others call for a different sealant.
Putty seals suitable mounting surfaces; it does not repair leaking supply-line connections or replace their washers.